Overview
The Scrolling Assistant helps you decide which equipment to scroll next and which strategy to use.
Most players scroll based on gut feeling. "7 out of 10 on 70% scrolls feels good enough" or "I'll reset if I fail twice in a row." These intuitions are often wrong. A run that feels bad early might still be worth continuing, and a run that feels fine might actually be inefficient compared to resetting.
Instead of relying on intuition, the assistant models every possible outcome mathematically. For each strategy, it computes the cost-optimal points to reset or continue based on your results so far, so you always know whether to keep going or start over.
Equipment Ranking
After running the analysis, you see a ranked list of your equipment slots. Each slot shows its most cost-efficient strategy and the expected DPS gain as a percentage.
Slots are ranked by efficiency: DPS gain per Spell Trace spent. Slots with the worst current scroll results relative to their potential naturally rise to the top, since they have the most room for improvement. Slots with no meaningful improvement are grayed out.
After analysis, the top-ranked slot is automatically selected and its strategies are shown in the detail panel. Click on any other slot to see its strategies, costs, and DPS gains.
Strategy-Target Pairs
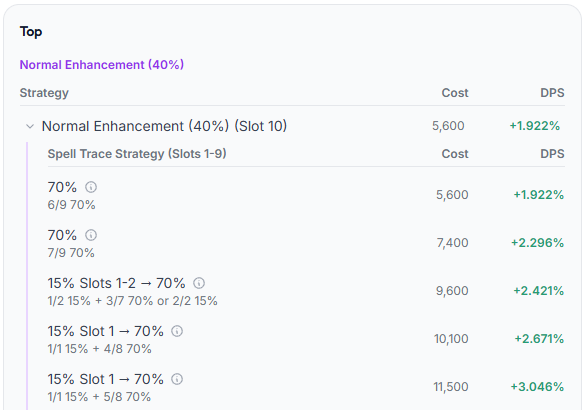
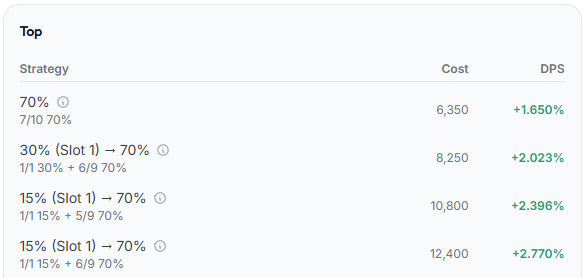
Each strategy (e.g. "70%", "15% (Slot 1) → 70%") can produce different outcomes depending on how many scrolls succeed. A 70% scroll applied to 10 slots might land anywhere from 0/10 to 10/10 successes. Each of these outcomes gives different DPS and costs a different amount of Spell Trace to achieve.
The assistant breaks each strategy into strategy-target pairs. Each row in the strategy list is a specific strategy paired with a specific target, shown below the strategy name (e.g. "8/10 70%").
A target defines the minimum number of scroll successes you're willing to accept for a completed equipment. It's a floor, not an exact aim. You will often land above it, and the expected DPS already accounts for all outcomes at or above the target, weighted by their probability.
Higher targets give more DPS but cost more Spell Trace because you reset more often to reach them. Lower targets are cheaper but give less DPS. The assistant shows only the targets that are cost-efficient: targets where no other option gives more DPS for less Spell Trace.
The info icon next to each strategy name opens the decision table for that specific strategy-target pair.
The Decision Table
Click the info icon on any strategy-target pair to open its decision table. This is the core of the reset breakpoint system.
The table has two columns: After (which slot you just scrolled) and Reset unless (the minimum successes needed to continue). Here's an example for "70%" with a target of "8/10 70%":
| After | Reset unless |
|---|---|
| Slot 1 | 1/1 70% |
| Slot 3 | 2/3 70% |
| Slot 4 | 3/4 70% |
| Slot 6 | 4/6 70% |
| Slot 7 | 5/7 70% |
| Slot 8 | 6/8 70% |
| Slot 9 | 7/9 70% |
Reading this example: after scrolling Slot 1, reset if it failed. After Slot 3, reset unless at least 2 out of 3 succeeded. After Slot 4, reset unless at least 3 out of 4 succeeded, and so on. Slots 2, 5, and 10 have no checkpoint — always continue past those slots regardless of results.
For mixed strategies (e.g. "15% (Slot 1) → 70%"), checkpoints can track multiple scroll types. You might see "1/1 15% and 3/4 70%", meaning you need both the 15% scroll on Slot 1 to have succeeded and at least 3 of the 4 applied 70% scrolls to have succeeded.
When multiple conditions are separated by "or", meeting any one of them is enough to continue.
Cost, Probability, and Attempts
At the top of each decision table modal, three summary stats are shown:
- Cost: the expected total Spell Trace to complete one successful run, including all resets. This is the realistic cost assuming you follow the reset breakpoints.
- Probability: the chance that a single attempt (one full scrolling run from Slot 1 to Slot 10 without resetting) meets the target.
- Attempts: the expected number of full attempts needed. This is approximately 1 / probability, rounded.
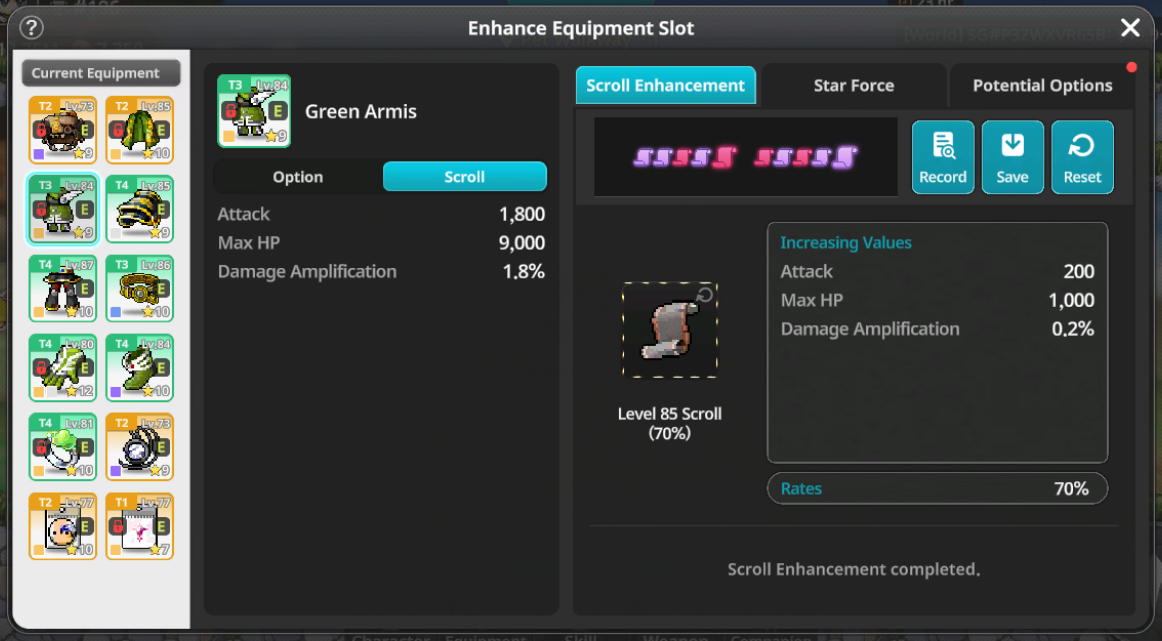
Exclusive Scrolls
If you have exclusive scrolls available, a second tab labeled Exclusive Scroll appears alongside the Spell Trace tab.
Strategies are grouped first by the Exclusive Scroll type and how many you're willing to commit (e.g. "Normal Enhancement (40%) (Slot 10)" means one Normal Enhancement 40% Exclusive Scroll on the last slot). Within each group, the Spell Trace strategy applies to the remaining front slots, with the same strategy-target pairs and decision tables as before.
Since exclusive scrolls are a limited resource, only commit them when you're satisfied with the Spell Trace portion of the strategy and aren't saving them for a stronger scroll tier at a higher level.
The decision table for Exclusive Scroll strategies includes an additional section showing the probability distribution of exclusive scroll successes and their DPS impact.
Walkthrough
Let's walk through scrolling an equipment from start to finish.
1. Run the analysis
Go to the Equipment page and open the Scrolling Assistant section. Click Analyze to compute strategies for all your equipment. The ranking will show which slot benefits most from scrolling.
2. Pick a slot
The top-ranked slot is automatically selected after analysis. Click any other slot if you'd prefer to scroll that one instead. The detail panel shows all available strategies for the selected slot.
3. Choose a strategy-target pair
Each row is a strategy-target pair. The top row is the most cost-efficient option. Lower rows trade higher Spell Trace cost for more DPS. Pick the row that fits your resources.
4. Open the decision table
Click the info icon next to your chosen strategy. The modal shows you exactly when to reset. Keep this open while you scroll in-game.
5. Scroll and follow the checkpoints
As you scroll each slot in-game, check the decision table. After each checkpoint slot, count your successes. If you don't meet the "reset unless" condition, reset and start over. If you meet it, continue to the next slot. The expected cost already accounts for resets, so don't worry about Spell Trace spent on failed attempts.
Putting It Into Practice
The assistant shows you the cost-efficient strategies for each equipment, but real decisions involve your total resources across all your equipment. Here's an example from my own experience.
I had just unlocked Level 85 Spell Trace scrolls and it was time to rescroll all my equipment. I also had some Normal Enhancement (40%) scrolls that I was willing to use, since it would be a while before I unlock the Level 105 scroll tier.
I switched to the Exclusive Scroll tab and committed to "15% Slot 1 → 70%" with Normal Enhancement (40%) on Slot 10, targeting 1/1 15% + 4/8 70% (expected cost 10,100, +2.671% DPS).
Using the same strategy on another equipment slot previously, I had to reset 22 times and spent around 25,100 Spell Trace. That's nearly 2.5x the expected cost.
On this equipment, I landed the 15% scroll on my first try, but after 8 slots I had only landed 3/7 on the 70% scrolls.
At this point, I had around 25,000 Spell Trace remaining and 6 other equipment still waiting to be rescrolled. I decided to ditch the exclusive scroll, finish the last slot with Spell Trace instead, and keep the exclusive scroll for later.
Looking at the Spell Trace tab, a comparable result like 1/1 15% + 5/9 70% would give +2.396% DPS.
The result was less than ideal, but passing the 15% on the first try saved me a lot of resets, and I got to keep a scarce exclusive scroll. More importantly, the Spell Trace I saved could go toward rescrolling my remaining equipment rather than being sunk into perfecting a single equipment.
The assistant shows you what's cost-efficient for each equipment, but you still need to decide how to allocate your resources across all your equipment. Sometimes accepting a good-enough result on one equipment and moving on will net you more total DPS than chasing the perfect outcome, or save you a significant amount of Spell Trace for future scroll tier unlocks. You can always come back and rescroll later.
Tips
- Scroll the highest-ranked equipment first. After finishing an equipment, update your scroll results in Enhance Equipment and your stats on the Character page before re-running the analysis.
- Higher targets aren't always better. A target of 9/10 on 70% scrolls might cost nearly twice as much Spell Trace as 8/10 for only a small DPS increase. Compare the DPS per Spell Trace of each row, not just the DPS gain.
- The "Show all" toggle reveals dominated strategies. These are strategies where another option gives more DPS for less cost. They're hidden by default but can be useful if you've already partially scrolled an equipment and want to see what's available with a specific scroll type.
- No checkpoint at a slot means always continue. The decision table only shows slots where the reset decision matters. If Slot 4 isn't listed, you should always continue past Slot 4 regardless of your scroll results so far.